The post Harvesting Cucumbers appeared first on Gracious Gardening.
]]>
Cucumbers are a relatively easy selection to grow for first time gardeners, and they are an ideal selection for the more seasoned growers. For these reasons and the attractive versatility that the cucumber offers, they are a very popular seed for people’s gardens. So, if you’ve sowed your cucumber seeds properly in pronounced mounds of nutrient-rich loose soil, approximately six inches apart, receiving plenty of direct sunlight, and adequate hydration that can run off thoroughly. If you’ve kept close attention to the first flower (male) and the flowers to follow about a week later (female), chances are, your cucumber plants experienced a very successful season, and if you live in a particularly warm region, your cucumbers are probably ready for harvest since they only need about 60 days in consistently warm weather to reach maturity. If you attempted to sow your seeds too soon and got hit with some left over frost, you most likely know by now already that crop is mostly shot.
Other Reasons You May Experience Disappointment When Harvesting Cucumbers
If you’ve somehow grown the type of cucumber plant that only produces female flowers (gynecious) and were concerned you had no males for pollination. If you have no prior knowledge of this, it is very possible that you were standing in your garden scratching your head in confusion. If you’ve sowed your seeds to close together, the vines will strangle each other. Without properly dug drainage for excess water to run off, your cucumbers will grow in mold, which will ruin most of, if not all of your crop. Although the plant vines can be trained to climb, it is more common for the cucumbers to remain on the ground.
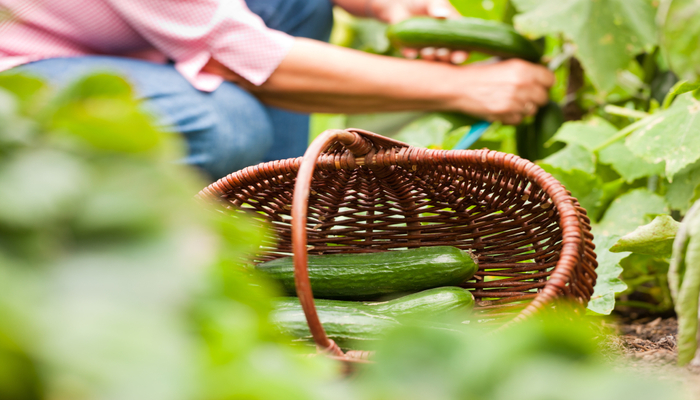
When Is It Time To Start Harvesting Cucumbers?
A well-managed garden grown in an ideal season can yield an abundant amount of cucumbers. Depending upon the type of seed you sowed, the maturity times can vary, but the cucumber variations all generally share the same short growing period of about 60 days. One week prior to this mark will probably begin producing mature fruits and from there, the rest will follow quickly. To begin your harvest you should prepare yourself with a pair of durable and comfortable gardening gloves, and a pair of sharp gardening sheers. The mature cucumber can range anywhere from three to eight inches in length and impressive girth depending on whether you’ve chosen a slicing cucumber or a pickling cucumber. The common cucumber will display a dark green color when mature although there are types that range anywhere from light green and yellow to all white in color. It is important to wear your gardening gloves as the cucumbers will tend to have small prickly spikes that can easily puncture the skin. The proper way to remove the fruit from the vine is to slightly twist rather than just pull the fruit off. Gently rinse the fruits of any dirt, allow them to dry and enjoy.
The cucumber is easily enjoyed sliced up in salads and is often pickled so that they can be eaten over the winter months, until spring is upon us and it is time to prepare your garden again.
Image: iStockPhoto
The post Harvesting Cucumbers appeared first on Gracious Gardening.
]]>The post How to Grow Vegetables in Cold Climates appeared first on Gracious Gardening.
]]>
Gardening in cold weather
Well, I come from the south and my grandma and great-grand parents always gardened in the winter time. That was the busiest season for them. They ran a farm, so getting up at the crack of dawn to feed the animals and take care of the vegetables and orchards were all they did day in and day out. Tackling the frost and the snow, and the unexpected were always keeping everyone on their toes. That was years ago, and even though times have changed, companies have developed many more options for gardeners to use in order to keep those winter gardens flowing.
Pick your vegetables
There are certain vegetables that can withstand the cold and grow well in winter. You have your root vegetables such as carrots, potatoes, beets, parsnips, radishes, ginger, and garlic. Try to harvest these before the first hard freeze if possible. Then you have the leafy vegetables such as cabbage, collard greens, mustard greens, and spinach. Herbs are also a good choice and can grow throughout the winter.
Choose what vegetable you would like to grow and go from there. Depending on the region you live in, you must keep an eye on the time the killing frost happens in your area. Plant around this time, and do it in enough time so that your plants can mature by the time the bad weather hits. Most local garden centers will have such information that will help assist you in that area.
Keep your garden protected
As I said before you have options today that will help to preserve your garden in the winter, so take advantage of that. You can create grow boxes and mini green houses that will protect your plants from the cold and hard winds. Keep them covered with greenhouse plastic that will block out the UV rays from the sun. This is special plastic that will last several years, so I think it will be a great investment for your garden. Try to add a thermometer under your coverings so that you can keep an eye on the temperature. You don’t want it to get too hot under there. If it is 50 degrees inside open up one end and let some air flow in. If it’s 70 degrees inside, take the plastic off for a while and cover them back up when the temperature falls down again. You also have an option to grow your garden inside your home if you have some special space for that.
There are so many ways to enjoy fresh vegetables in the winter now. Do your research and check out your local garden center for new and innovative ideas. It will be well worth the time, and think of the money you will save by not having to go to the grocery store all the time for fresh vegetables. Do what fits your lifestyle and just have fun producing those delicious fresh vegetables this winter.
Photo Credit: Thinkstock
Will you grow vegetables in cold climates?
The post How to Grow Vegetables in Cold Climates appeared first on Gracious Gardening.
]]>The post Vegetables To Plant in August appeared first on Gracious Gardening.
]]>
We are now in the dog days of summer. It’s hot and humid in most areas, and not typically the time of the year many gardeners consider an ideal planting month. But August is actually a perfect time to begin a second gardening season. There are many vegetables that are very productive when planted in August. So if you are ready for round two and eager to feel your hands in the soil again, slather on the sunscreen, make yourself a cool glass of iced tea, and start digging.
* Cucumbers — Grown on a vine or bush, this delicious fruit will grow quickly and in abundance. Vine grown cucumbers are much tastier, but require much more space for growing than the bush varieties.
* Beans — August is the deadline for sowing beans. Planting both bush and pole beans now will produce a continual crop if you try a continual 7-10 day sowing of different bean varieties.
* Radish — This veggie is quick and easy to grow, so if you plant them now you can have a crop ready in just 30 days.
* Lettuce — If planted in August you will yield a nice crop in the fall.
* Kale — Also for an excellent fall and winter harvest if planted by mid-August.
* Peas — Try planting both green peas and sugar peas for a moderate harvest by autumn.
* Cauliflower — To enjoy this vegetable by fall, sow them now.
* Kohl Rabi — When planting this unusual vegetable now, it will be ready in as little as 8 weeks.
* Herbs — Basil and Cilantro are quite fast-growing and will be ready for harvesting in about a month.
* Spinach — Because spinach grows well in the cooler weather of the autumn months, August is an excellent time to plant it.
It’s important to know the average first frost date in your region so you can calculate how fast a vegetable will mature so it isn’t planted too late and risk being killed by cold weather. Some vegetables can tolerate some frosty temperatures and continue growing. However, others cannot and will cease growing. You need to do a little research on the veggies you wish to plant to find out exactly how late in the month you can still plant and be safe.
Photo Credit: thinkstock
The post Vegetables To Plant in August appeared first on Gracious Gardening.
]]>The post Prepping Fruit Trees in Late Summer and Early Fall appeared first on Gracious Gardening.
]]>
We’ve been looking at how our fruit-bearing plants fare at the end of summer. We shouldn’t, however, neglect all the necessary care for our fruit trees. They really do require as much maintenance as our more fragile plantings. Especially as summer turns to fall. That’s when you really need to protect your trees against disease and pests. And, as usual, it starts with a thorough inspection. [photo via wikimedia]
If you’re as paranoid as we are, then you’ve already been checking your fruit trees all through the summer. Autumn is when we check to see which branches need pruning, and apply plenty of organic pest control. That includes the life-affirming fungus of Promot Plus, which feeds on common rot. We get a head start in battling fire blight by applying Agimycin on our apple trees. Then we add a liberal measure of dormant oils before the leafs really start falling. Those can wash away aphids and offer pest control against scale bugs–and we have some copper mixes that also battle fungus. Galltrol-A is our preferred brand of the microbe Agrobacterium radiobacter, which repels crown gall disease.
Pruning in late summer exposes the tree to some disease and pests, so that’s why we’re really into our organic pest control. We’re making a judgment call, because the trees are also exposed to hazard if you have broken limbs hanging from them. We kind of like the following as general rules for pruning: You get the thin small pit fruits about 2 to 4 inches apart, while bigger pit fruits should be about 3 to 5 inches apart. Get your groups of 2 to 3 hard fruits–apples, pears, etc.–about 6 to 8 inches apart.
We use pinestraw as a nice mulch for the base of our trees. It hampers weed growth and allows our trees to maintain more moisture near their roots. (Citrus trees do well with light bark dust.) We also clear out the fruit and take it to public parks to feed to critters who need to fatten up for the winter. It helps the trees, too. The thinning keeps branches from snapping over excessive weight.
You’re also sparing yourself the hassle of fruits becoming infected or diseased. The animals get the smallest fruits. Leave the bigger ones growing at the outside. Those can still get some sun–and we really hate to say goodbye to the last harvest from our fruit trees.
The post Prepping Fruit Trees in Late Summer and Early Fall appeared first on Gracious Gardening.
]]>The post Pruning Raspberries for Early Fall appeared first on Gracious Gardening.
]]>
There’s a lot more debate to pruning raspberries than is really necessary–especially when we talk about pruning them in the fall. A lot of the confusion is caused by people not know what kind of raspberries they have in the garden. The only raspberries you need to prune at this time of year are the Everbearing kind. Those aren’t really everbearing plants. It would be more accurate to call them fall-bearing raspberries. Most folks seem to call them everbearing because it’s a shock to see them producing a crop in cooler weather. [photo via wikimedia]
We prefer everbearing plants because…well, frankly, they’re just easier to grow than the spring-bearing variety. You get two harvests, also. That’s one in mid-to-late summer, and then the second in the fall. (They’re smaller crops, but we’re not greedy.) Everbearing raspberry plants need to be pruned for the fall season, though. Ignore the temptation to let them grow wild and larger. You won’t really get any more berries out of them. In fact, you’ll end up with more problems.
Pruning prevents a lot of diseases. We’re talking extreme pruning, too. We try to keep our raspberry plants in a tight row. That makes it easier for us to eye the necessary pruning. We try to cut back to a 12″ footprint. That’s in addition to the pruning we’ve done on any dead or diseased canes earlier during the season. It’s always a good idea to stay on top of those, just as with your blueberry plants.
The fruit of your raspberry plant will only grow on new raspberry canes. That’s why we’re so comfortable cutting back with some real vigor. All of the old growth has to be cleared out every year. Once we’ve had the first frost, the pruning is as simple as cutting all the canes right down to ground level. Other gardeners prefer to cut back to a height between one and three feet. They’re looking to see if the fruit will grow on the lower part of the cane. That’s also perfectly respectable. Maybe we just like hacking things down to the ground.
In any case, you should expect your shortened canes to be bearing new berries by June–and from the tops of the cane by August. These can produce fruit right up to that first frost. As winter sets in, the canes will look more like twigs, and then you’ll get some impressive growths later. We say that as fans of the Caroline variety of raspberries, but we also endorse the Heritage variety.
And we can’t discuss all this without mentioning the evil Raspberry Crown Borer [photo via omafra]…

Yes, it looks like a yellow jacket, but that’s really a pest that love raspberries and blackberries. That’s our best reason for cutting our canes down to the ground. These li’l creeps love to dig holes in the cane–so, if you don’t want to cut back, keep an eye out for them. We don’t have to worry about it. We’re hackers.
The post Pruning Raspberries for Early Fall appeared first on Gracious Gardening.
]]>The post Making Room for Winter Gardening appeared first on Gracious Gardening.
]]>
You don’t have to quit gardening just because winter is coming. In fact, some of us really like the challenge. We also like calling it a winter garden and having people think we’re really out there tilling in the frost. In truth, of course, any talk of winter gardening refers to plants that mature quickly and are ready to harvest in winter–thanks to being able to put up with the drop in temperature. That means we start in late summer–which means we’re off to a late start now, but we’re already hard at work. [photo via wiki commons]
It begins with doing some math, of course. We have to figure out how much space we have as we clean out the summer crops, and also calculating how much time these new plants need to grow. There’s also the matter of deciding what to plant. We’re hearing from the Farmer’s Almanac that this is going to be a harsh winter, so we’re looking at broccoli, spinach, and chives this year. Maybe some bunching onions, too. Those should all be mature in 30 days. If you’re further South, you can consider the kinds of vegetables that take a leisurely 60 days: leeks, collards, perennial herbs, carrots, beets, cauliflower, brussel sprouts.
We like to get out some graph paper and really plot out our winter garden territory. It’s not unusual for mature vegetables to keep growing right through the end of the year. We haven’t even been able to rule out January, thanks to the resilience of lamb’s lettuce, carrots, claytonia, and kale. There’s also the pleasant surprise of seeing what manages to spend the winter as seedlings for an early harvest around March or April. That’s when the garden really pays off, too. Check out the prices in produce aisles around that time of year.
We keep things simple in protecting our plants. We set up a frame and put a layer of mulch over them. We recently tried using bubble wrap as a cover, and that worked really well. And don’t forget that you can always bring in some plants from the winter cod. We’ve had lettuce and spinach do a good job of surviving–and, frankly, we’re always ready for more surprises. That’s one of the best things about winter gardens. They’re winter wonderlands.
The post Making Room for Winter Gardening appeared first on Gracious Gardening.
]]>The post Spotted Wing Drosophila Fly: Watch Out For Them–And Manage Them appeared first on Gracious Gardening.
]]>
You may not remember all the way back to the start of this growing season, but the warning was put out early to watch out for some serious pestering by the spotted wing drosophila fly. That’s the invasive vinegar fly that’s been causing trouble ever since it was first spotted in California in 2008. It’s been a major problem in the Pacific Northwest, and has also caused problems in Pennsylvania. The SWD–as it’s become known–is real tourble, since the females can lay their eggs in unripened fruit. August is always a scary time with these things, since there’s been SWD infestations of fall blackberries and raspberries, in addition to peaches, plums, cherries, strawberries, and grapes late in the season. [image via fruitgrowers news]
You really need to be watching out for the spotted wing drosophila fly so that they can be killed off before building up a big population. The SWD is particularly loathsome for targeting young fruit over rotting fruit. There are lots of pesticides that yo can use to go after the pest, but we kind of hate how the SWD has become responsible for an increased amount of sprayings. We don’t like the chemicals, and it’s an added expense to the farmers. And, eventually, the consumers.
The SWD is a pesty even by pest standards. You can find them swarming over orchards that don’t even have crops. They’ll settle into trees that haven’t carried fruit for over a year. They seem to always find new fruits that they haven’t gotten around to sampling. (The vineyards are always dreading the day when the SWD discover grapes.) The best baits for SWD also bring in enough other bugs that you might be better off not leaving anything out.
It’s pretty terrible to think of having SWD hanging out during the winter. The survivors are mostly adult females, and they can lay up to 600 eggs in fruit. Those eggs can hatch in as quickly as two hours, with the larvae feeding on the fruit for anywhere from three to thirteen days. The best management remains getting as much fruit cleared out as possible. Not just the harvesting, but also clearing out any fruit on the ground or that’s failed to drop from the trees. That–and some eternal vigilance–is your best bet for getting through this time of year with minimum SWD carnage.
The post Spotted Wing Drosophila Fly: Watch Out For Them–And Manage Them appeared first on Gracious Gardening.
]]>The post Spring Blooming Bulbs–When to Plant, and How to Plant Late! appeared first on Gracious Gardening.
]]>
Want to know the best time to plant your Spring blooming bulbs? Well, that depends–but we’re certainly heading into the time when everyone should be giving that some thought. You have to know your zones, of course, so start by consulting your local listings. Once you have that vital information, we can start laying down the cold hard facts for when the ground gets cold and hard. [photo via wikimedia]
The most important thing about Spring blooming bulbs is getting their roots systems into the ground. They need at least a good month in the ground to get settled in before the ground starts to freeze–but you don’t want to plant them too early. You might end up being surprised by some early sprouting. A bulb only has so much power to offer, and a lot of it gets burned pushing up leaves. That’s energy that the little bulb is going to need to make it through the cold months.
The weather’s been pretty unpredictable, too, but the Farmer’s Almanac says that we’re due for a harsh winter that will settle in early. We’re not expecting much in the way of an Indian Summer–but we say that from one of the colder Zones. Our fellow frozen folks in Zones 1 through 4 should get ready to plant their bulbs during late August and September. If you’re in Zones 4 through 7, then hold off until it gets cooler in September. You can get away with planting your bulbs up to November, and maybe as late as December. All of you lucky people in the other Zones probably won’t have to worry about a big chill period.
If you’re like us, you’ll probably find a few bulbs in early November that you just forgot about. Don’t give up on them. Check to see if they’re firm and feel plump. Go ahead and try planting them. Any bulbs left out of the ground during winter are just going to die, anyway. You wouldn’t be the first person to have bulbs that establish roots in close to freezing temperatures. Besides, cold weather is good for a bulb in the soil. They need to get lulled out of their dormancy. A good three months in icy dirt will do them a lot of good. Don’t forget the old saying about how there’s still time to plant bulbs if you can manage to dig up the dirt.
Just try to plant them very deep for some extra warming insulation. Mulch them, too. You just need some evergreen branches, fallen leaves, or straw. Don’t give up on them too quickly, either. The shoots won’t break out of the soil on time with the bulbs you planted previously–but they might get there.
And what if you can no longer dig up the dirt? We won’t give up on those bulbs yet. (Seriously, it’s amazing how long you can forget you have some of those things.) You can try potting your bulbs in large containers. Plant them dead center, though. They might freeze if too close to the sides of the pot. Then put the bulbs somewhere cold–like your shed, or your porch, or the garage. The idea is to give them a cold (but not extremely cold) environment. That soil will need some maintenance, too. Don’t let it stay wet, but do some watering each month to keep the dirt from going dry. Then you can take the pot outside once you’re safely into Spring. See if the bulbs produce shoots in the pot, or do some transplanting after the sprouts have started.
You can also try putting the bulbs on top of the frozen ground. Just toss on a good amount of potting soil. We’d say at least 8 inches of soil, covered in cloth or wire to keep the soil in place. Then add more mulch once the ground has frozen.
If you can’t dig into the soil, plant on top of it. Spread your bulbs out and then top them with at least 6 – 8 inches of potting soil. It helps to circle the area with chicken wire or hardware cloth. The wire will hold the soil in place and deter rodents. You can remove it in the spring. Mulch the mound, once it freezes hard.
Yes, it would really be for the best if you got them all out at once–and maybe you’re more organized than we are. Still, never say die when it comes to bulbs. Even those that struggle with the late planting can prosper later on. And then they’ll forgive you for being so forgetful. At least, we like to think so.
The post Spring Blooming Bulbs–When to Plant, and How to Plant Late! appeared first on Gracious Gardening.
]]>The post How to Attract Hummingbirds (and Keep Them Healthy) appeared first on Gracious Gardening.
]]>
It’s late August, and the hummingbirds will be starting their migration. Some of us will be sad to see them going, and others will be welcoming these valuable garden companions. Never mind the charm of these slight birds that weigh less than a nickle. They are also very important to gardens as both insect predators and pollinators. And this is a good time to look at ways to keep those helpful birds hanging around (or coming to) our gardens. [photo via wikimedia]
Hummingbirds need eat 1/3 of their body weight daily just to fuel their frantic wings. A lot of their diet involves protein-packed insects and nectar for their carbs. Gardens have a lot of inherent growths that draw in hummingbirds. Shrubs, vines, and trees are all both a safe place for them to rest and also good places to find food. From there, you can make some smart planting choices to really bring in the birds.
Hummingbirds are very attracted to red and orange flowers. That gives you plenty of options. Here’s a list of a hummingbird’s favorite flowers (we’ve left off the invasive ones):
- Bee Balm
- Red Columbine
- Delphinium and Hollyhock
- Catawba Rhododendron
- Rose of Sharon
- Trumpet Vine and Japanese Honeysuckle (both, unfortunately, invasive)
- Cardinal Vine
- Lantana and Fuchsia
You can also coral bells, honeysuckles (bush or vine), petunias, penstemons,hawthorn, and flowering crab apple. It’s also wise to plant nectar plants that bloom as a series. A well-planned collection can provide nectar from spring into fall. (Keep in mind that hummingbirds can like bright colors enough for that to be a danger to them. Some gardens have electric fences with red and orange insulation that can draw the birds to a fatal zap.)
Hummingbird feeders can also cause problems. Keep them clean, and make sure that you’re using a sugar solution that’s fresh. They shouldn’t have any more sugar than they find in natural nectars. The best mix is one part sugar to four parts water. Then boil that for about 45 seconds to prevent any mold from growing. That will also prevent fermentation. (Avoid using honey; it can go bad with fungus growth.) You have to boil instead of microwave to protect the nutritional value of the sugar. No artificial sweeteners, of course. Food coloring is also a bad idea. Just use bright colors on the feeder to attract the hummingbirds.
There’s nothing sadder than the sight of hummingbirds fighting–and they’ll fight over too little feeders. Get many of them to spread apart, preferably in the shade. Don’t forget to clean the feeder with vinegar as you’re trading out the sugar water.
You’re making a commitment, too. Hummingbirds grow dependent on regular food sources. You should keep yours going through October if you’re in the northern states. They can certainly use the carbohydrates for their migration, and the birds will pay you back by ridding your yard of some late summer pests. But we hope the hummingbirds stay away from praying mantises. Did you know a praying mantis can eat a hummingbird? Yes, they can–so let’s all hope we avoid that sight in our gardens.
The post How to Attract Hummingbirds (and Keep Them Healthy) appeared first on Gracious Gardening.
]]>The post How to Watch for Zimmerman Pine Moth Damage in Scotch & Austrian Pines appeared first on Gracious Gardening.
]]>
The Zimmerman Pine Moth has become a problem in recent years–and we’ve learned to go after them in late summer. The larvae of the moth damages trees by tunneling through and under the bark. This tunneling leaves gouging wounds, most typically at branch crotches. With infestation, the tree’s injuries excrete a pale yellow, popcorn-like mass of sap. To prevent infestation before it begins, a preventative insecticide spray is applied to the trunk in April or early May. [photo via wikimedia]
The Zimmerman Pine moth establishes itself along the Front Range. Austrian pines are most commonly affected, but Scotch and ponderosa pines are also at risk. Because the Zimmerman Pine moth makes such large wounds at branch crotches, the branches tend to break off as they die away. This breakage typically happens near the top of the tree where the moth prefers to spend its time.
The first sign of a Zimmerman Pine moth infestation is the popcorn-like masses of sap that form at the wound sites where the branches meet the trunk. These masses may get as big as golf balls and often resemble bunches of small, pale grapes. Although this is the first external sign, damage internally has already been done.
The adult moth is rarely seen, but is midsized with gray wings blended with red-brown and marked with zigzag lines. It is difficult to distinguish the adult Zimmerman Pine moth from others in its genus. Larvae are dirty-white caterpillars with some green or pink on occasion. They can be found rather easily among the popcorn-like masses they helped create on the injured trunk and branches.
Habits of the Zimmerman Pine Moth
The Zimmerman Pine moth lives for one year. The young caterpillar overwinters inside a small cocoon underneath the bark of its host. In mid to late April and May, the caterpillar becomes active again and tunnels into the tree. When the caterpillar first begins tunneling, it may start at the tip of the branch, causing it to die off first. By late spring, the destructive caterpillars migrate toward the base of the branch, tunneling into the whorl area. The caterpillar continues its feeding frenzy into July. At maturity, the caterpillar pupates inside a chamber in the popcorn-like masses.
Controlling the Zimmerman Pine Moth
Spring and late summer are the best times to stage an attack on the Zimmerman Pine moth. When the caterpillars are at their most active is when they are most vulnerable. Trunk sprays that drench and penetrate into bark are best to kill off the young caterpillars. April to August is the best time to apply the sprays before the exposed larvae have a chance to tunnel into the tree.
The post How to Watch for Zimmerman Pine Moth Damage in Scotch & Austrian Pines appeared first on Gracious Gardening.
]]>